Keynesian Multiplier Effect – Shifts in Aggregate Demand
Macroeconomics
This diagram shows how an initial increase in aggregate demand leads to a multiplied increase in national output (real GDP) and price level within the Keynesian framework.
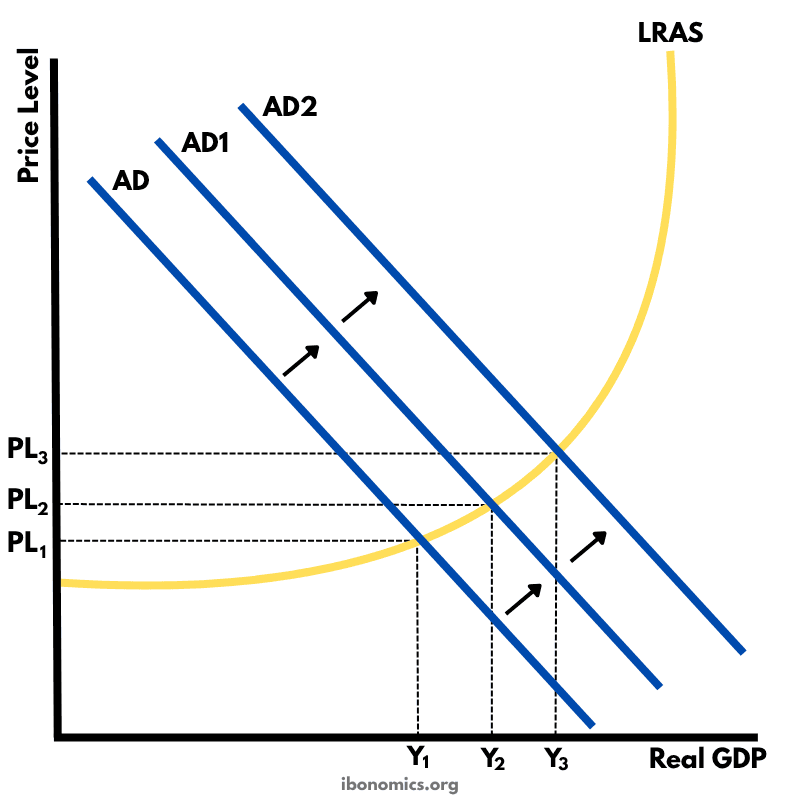
Curves and Elements
ad
AD: The initial aggregate demand curve before the multiplier effect.
ad1
AD1: The result of the first round of increased spending.
ad2
AD2: Final impact of the multiplier, showing further outward shift in AD.
lras
LRAS: The Keynesian long-run aggregate supply curve, which becomes vertical at full employment.
y1
Y1: Initial equilibrium output before any AD increase.
y2
Y2: Intermediate level of real GDP after partial multiplier effect.
y3
Y3: Final level of output after full multiplier effect, near or at full employment.
pl1
PL1: Initial price level.
pl2
PL2: Price level after moderate increase in AD.
pl3
PL3: Price level after strong increase in AD, reflecting inflationary pressure.
arrows
Black arrows: Indicate the outward shifts of AD curves from AD → AD1 → AD2.
In the Keynesian model, an initial increase in aggregate demand (AD → AD1) leads to a larger overall increase in real GDP due to the multiplier effect.
Further increases (AD1 → AD2) continue this expansion, but as the economy approaches full capacity (Y3), increases in AD result more in inflation (PL1 → PL3) than output growth.
The curved shape of the LRAS illustrates that the economy initially has spare capacity (horizontal portion), then experiences increasing opportunity cost (upward-sloping segment), and finally reaches full employment (vertical segment).
The multiplier effect is stronger when the economy is below full employment, leading to large increases in output with only mild inflationary pressure.
At Y3, the economy is at full employment, and any further increase in AD will lead primarily to inflation, not output growth.
More Macroeconomics Diagrams
Explore other diagrams from the same unit to deepen your understanding

A diagram illustrating the fluctuations in real GDP over time, including periods of boom, recession, peak, and trough, relative to the long-term trend of economic growth.

This diagram shows the intersection of the aggregate demand (AD) and short-run aggregate supply (AS) curves to determine the equilibrium price level and real GDP.

A diagram showing the Classical model of aggregate demand (AD), short-run aggregate supply (SRAS), and long-run aggregate supply (LRAS), used to explain long-run macroeconomic equilibrium.

A Keynesian aggregate demand and long-run aggregate supply (AD–LRAS) diagram showing how real GDP and the price level interact across different phases of the economy, including spare capacity and full employment.

A diagram showing an output (deflationary) gap, where the economy is producing below its full employment level of output (Ye).
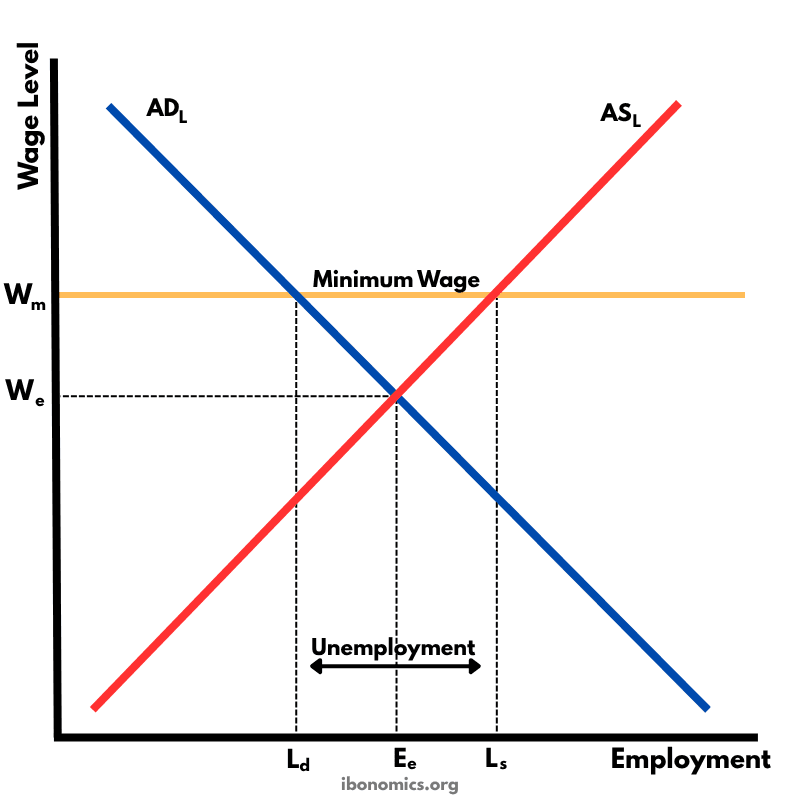
This diagram shows how a government-imposed minimum wage above the equilibrium wage causes excess supply of labour, resulting in unemployment.